Originally, anyone on an agile team used to write User Stories to
communicate the work to be done. However, over time, largely driven by
the expansion of the Scrum framework, the
Product Owner became the primary person writing these stories and
organizing them into a product backlog. However, anyone can (and should)
write a User Story. Fábio Aguiar and I wrote our book about the Product
Backlog Building technique to help everyone on the team write good
user stories.
What's makes a good User Story?
Before I introduce the PBB canvas, it's useful to understand what
makes a good User Story. So I'll describe various heuristics that are
commonly used.
3Ws of User Story
User Story is a textual format for the concise description of a
requirement, which seeks to answer three specific questions from the
acronym known as 3Ws: Who? What? and Why?
- Who is it for?
- What is the action or activity the person accomplishes with it?
- Why will the person use it (benefit or reason)?
INVEST
In the book Extreme Programming Explored, William C. Wake shared the
acronym INVEST, where each letter represents one of the six important
characteristics of a User Story:
- Independent: One story does not depend on another.
- Negotiable: A story captures the essence of what is desired. It is not
a fixed contract. Conversations and negotiation are welcome.
- Valuable: A story clearly describes customer or user value.
- Estimable: A story provides enough information for the development
team to estimate it.
- Small: A story should be relatively small in size to complete in
the shortest possible time and fit into an iteration (Sprint),
considering the context of the team.
- Testable: A story must be clear enough that tests can be defined for
it.
A few years after this creation, Mike Cohn ended up renaming the
letter S, from small, to sized appropriately, as some people created
stories a little bigger, but suited to their context.
3Cs Model
Card: The User Story description must fit on an index card, containing
enough to identify the User Story. The most common format is:
As a «role/profile»
I want to «action/activity»
so that «benefit/reason»
Here is an example:
“As a participant, I want to register for an event so that I can attend it.”
Conversation: A User Story description should fit in an index card.
The main reason is that there isn't much room to write, which forces the
written description to be brief. Therefore, a lot
of conversation is needed to clarify doubts and detail the work needed to
implement it. Working with User Stories means accepting that
conversations about work will be ongoing, and not just placed at the
beginning when the requirement is initially set. The best documents help
people remember conversations, not replace them.
Confirmation: This is where you determine if the User Story goal is
achieved. To do this, the acceptance criteria confirms that the User
Story has been implemented correctly and successfully delivered.
Acceptance criteria must be defined for each story before the team starts
implementing it. That way, there are no surprises when checking the
completion and verifying the outcomes.
Writing stories with PBB
As seen earlier, writing a User Story basically answers three main
questions: Who? What? Why?
The “who?” refers to the persona. The “what?” refers to the work item
to build the action or activity the person needs; and the “why?” speaks
to the benefits of using it.
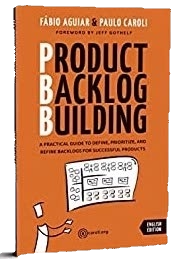
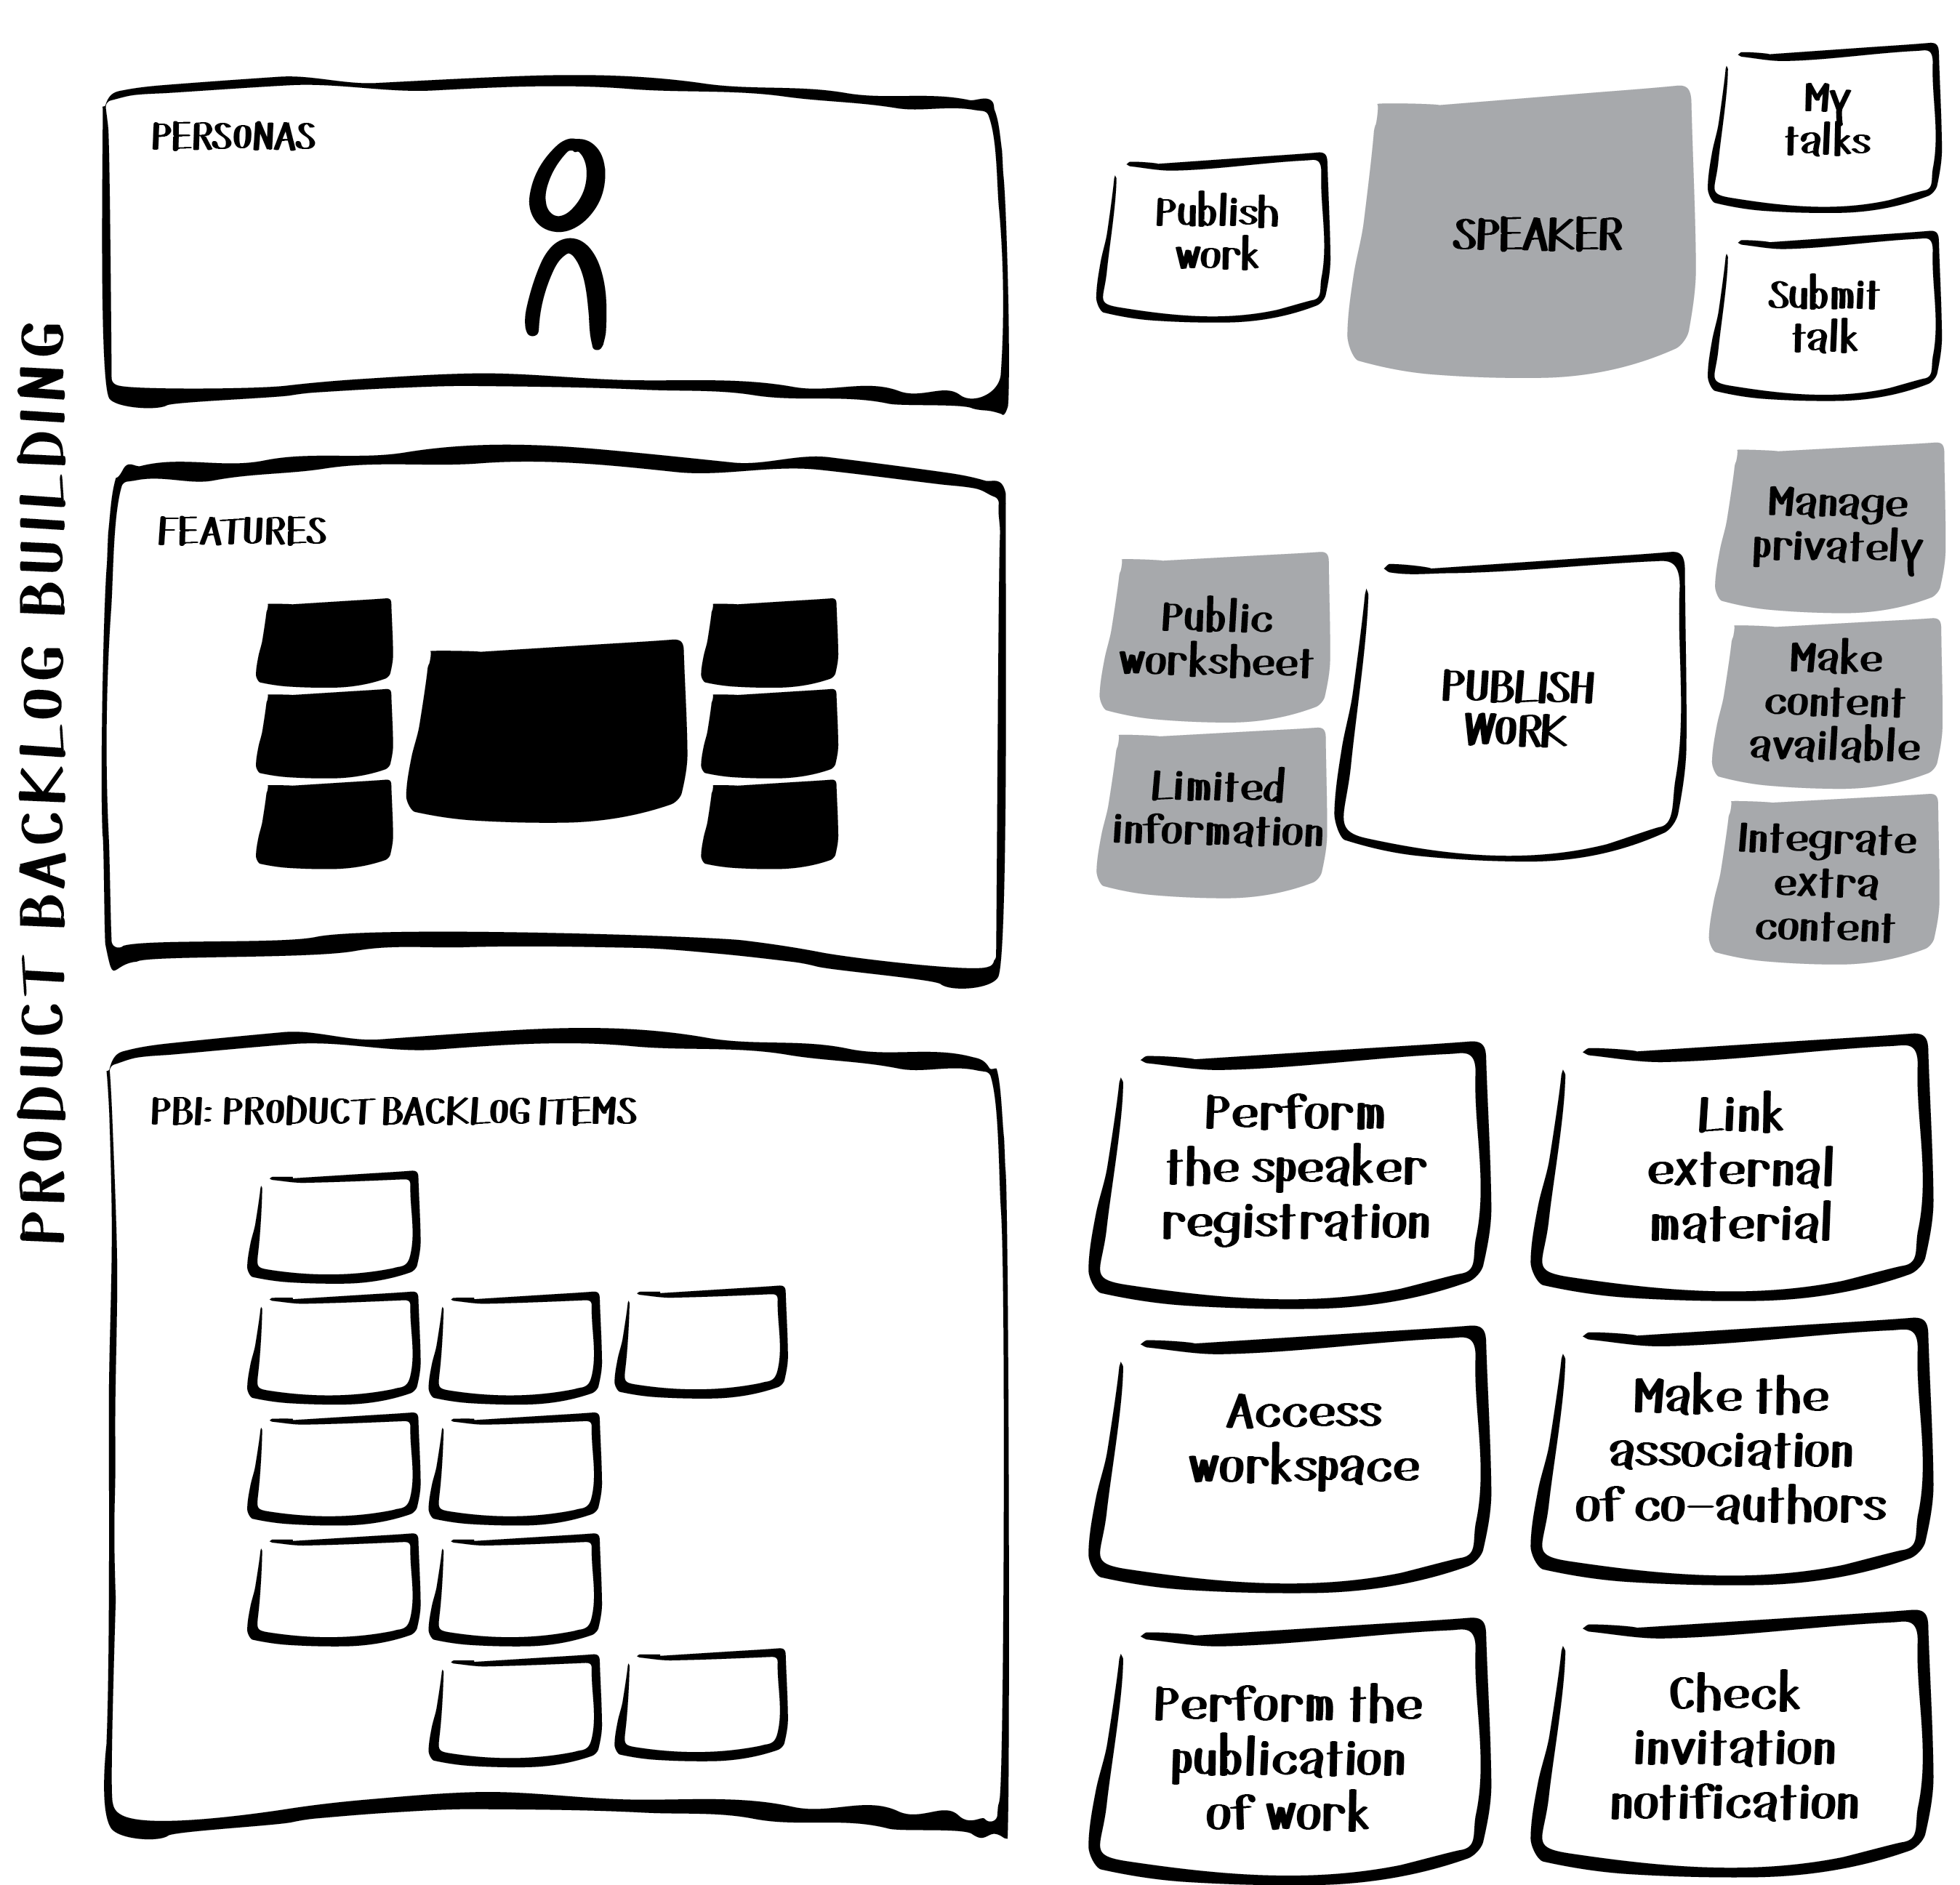
In the PBB book, Fábio and I share a step by step for identifying personas,
features and work items for building great User Stories via the PBB canvas.
In this article I´ll share how to fill in the canvas and write a User Story
for a digital product example. It is about the Talks Collection, a digital
product created by a regional agile community to prepare a portfolio of talks
and organize events.
Next is a description of three steps for filing up the Persona, the Features
and the Product Backlog Items blocks of the PBB canvas. I use some of the Talks Collection example
personas and features to illustrate it.
Describe the persona
A persona represents a user of the product, and so a description should speak
not only of the person’s role, but also their needs and goals. This creates a
realistic representation of the user, helping the team to describe features
from the point of view of who will use the product.
Describe the main personas from questions such as: “What is this person’s profile?
What does this person do? What does this person expect?”
Currently, it is relatively common to find discovery workshops, inceptions,
and other activities that generate artifacts and knowledge about the personas
– such as, for example, the empathy map. If this is the case, share the previously
constructed material. But remember that, at the time of PBB, the focus is on the
profile of the personas and their activities, which are necessary points for the next step.
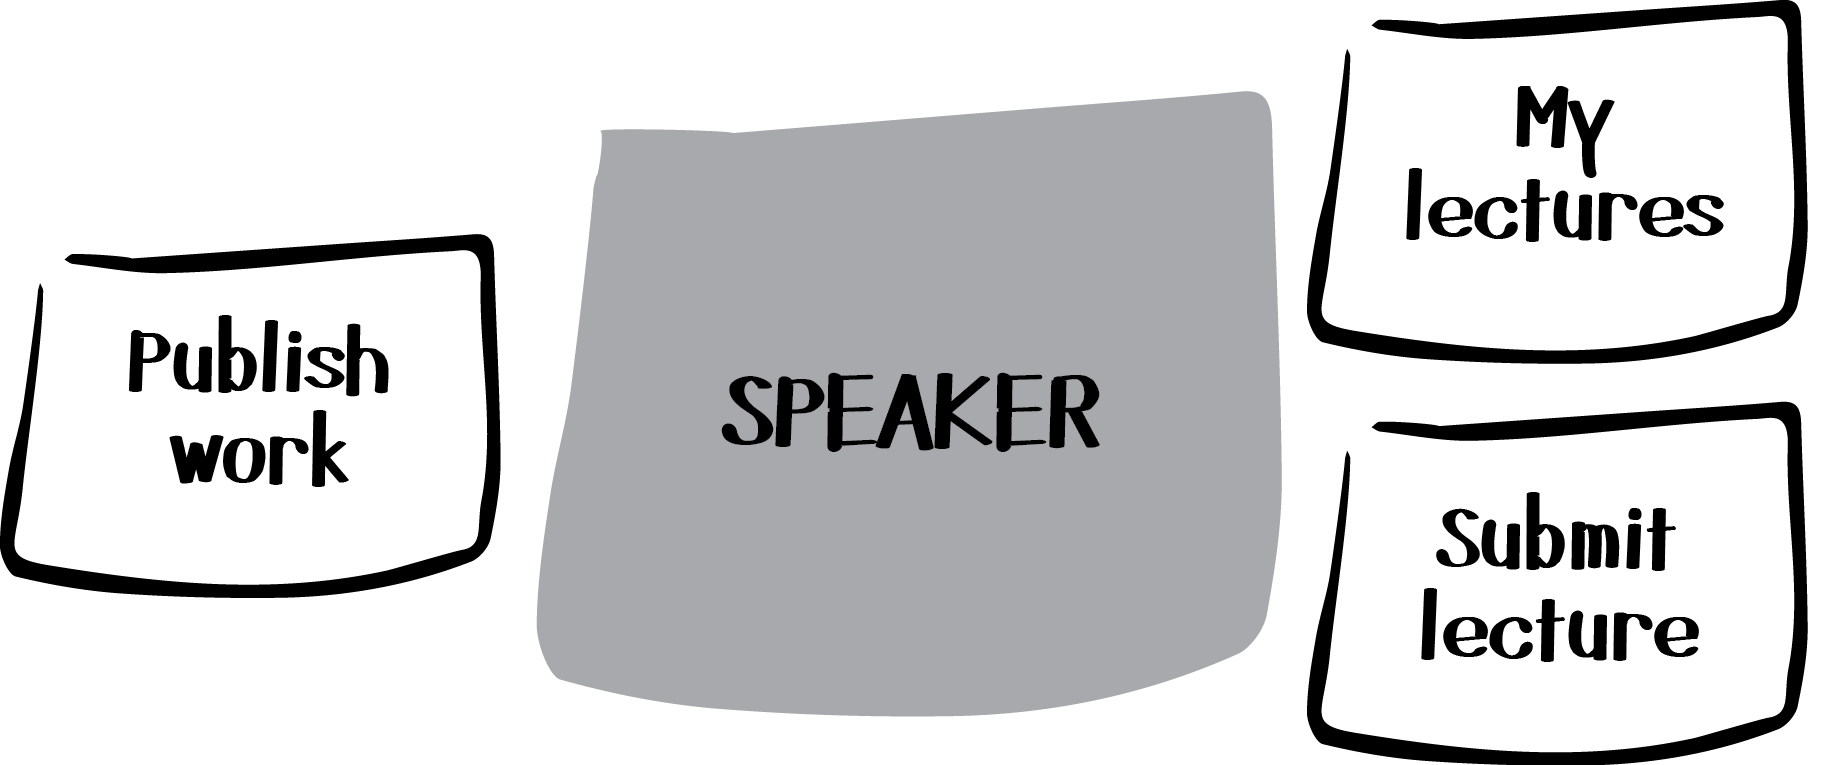
Understand the Features
With a good understanding of the persona and their activities,
it's time to analyze each one of
them, reread them, and look for actions or interactions of the personas with the product,
so that you can represent each of these interactions as a feature.
Describe the features from a answering the following questions: the user is trying to
do something, so the product must have a feature for that. What is it? What persona issues
does this feature solve? What benefits does it bring to the persona?
Write the feature description on one big post-it, then write down the challenges and benefits
on smaller post-Its and place them next to the post-It, describing the feature.
Features are generally described at a higher level than the work items
that will appear in a development plan. Before starting
to develop a feature, it must be analyzed and its work items must be described and quantified.
In PBB Canvas, you first identify, understand, and prioritize the features, then detail them in
product backlog items.
Identify the PBIs
Product Backlog Items (PBIs) are elements that make up the product backlog. They reflect the
development work needed to improve the product and to meet customer or stakeholder needs.
In the previous step, you described the features along with their challenges and benefits.
Now it becomes necessary to break these down further to allow for smaller, more accurate items.
These are called PBIs.
To identify the respective PBIs in the product backlog, ask participants to answer the following
questions: “What is the first work item (or step) for this feature? And the second? And the next ones?”
Each PBI must represent an action performed by a user on the product. For example: 1) “Buy a book” and
2) “Add a speaker to the conference.” These actions are described in textual form to provide context
and uniquely identify the item.
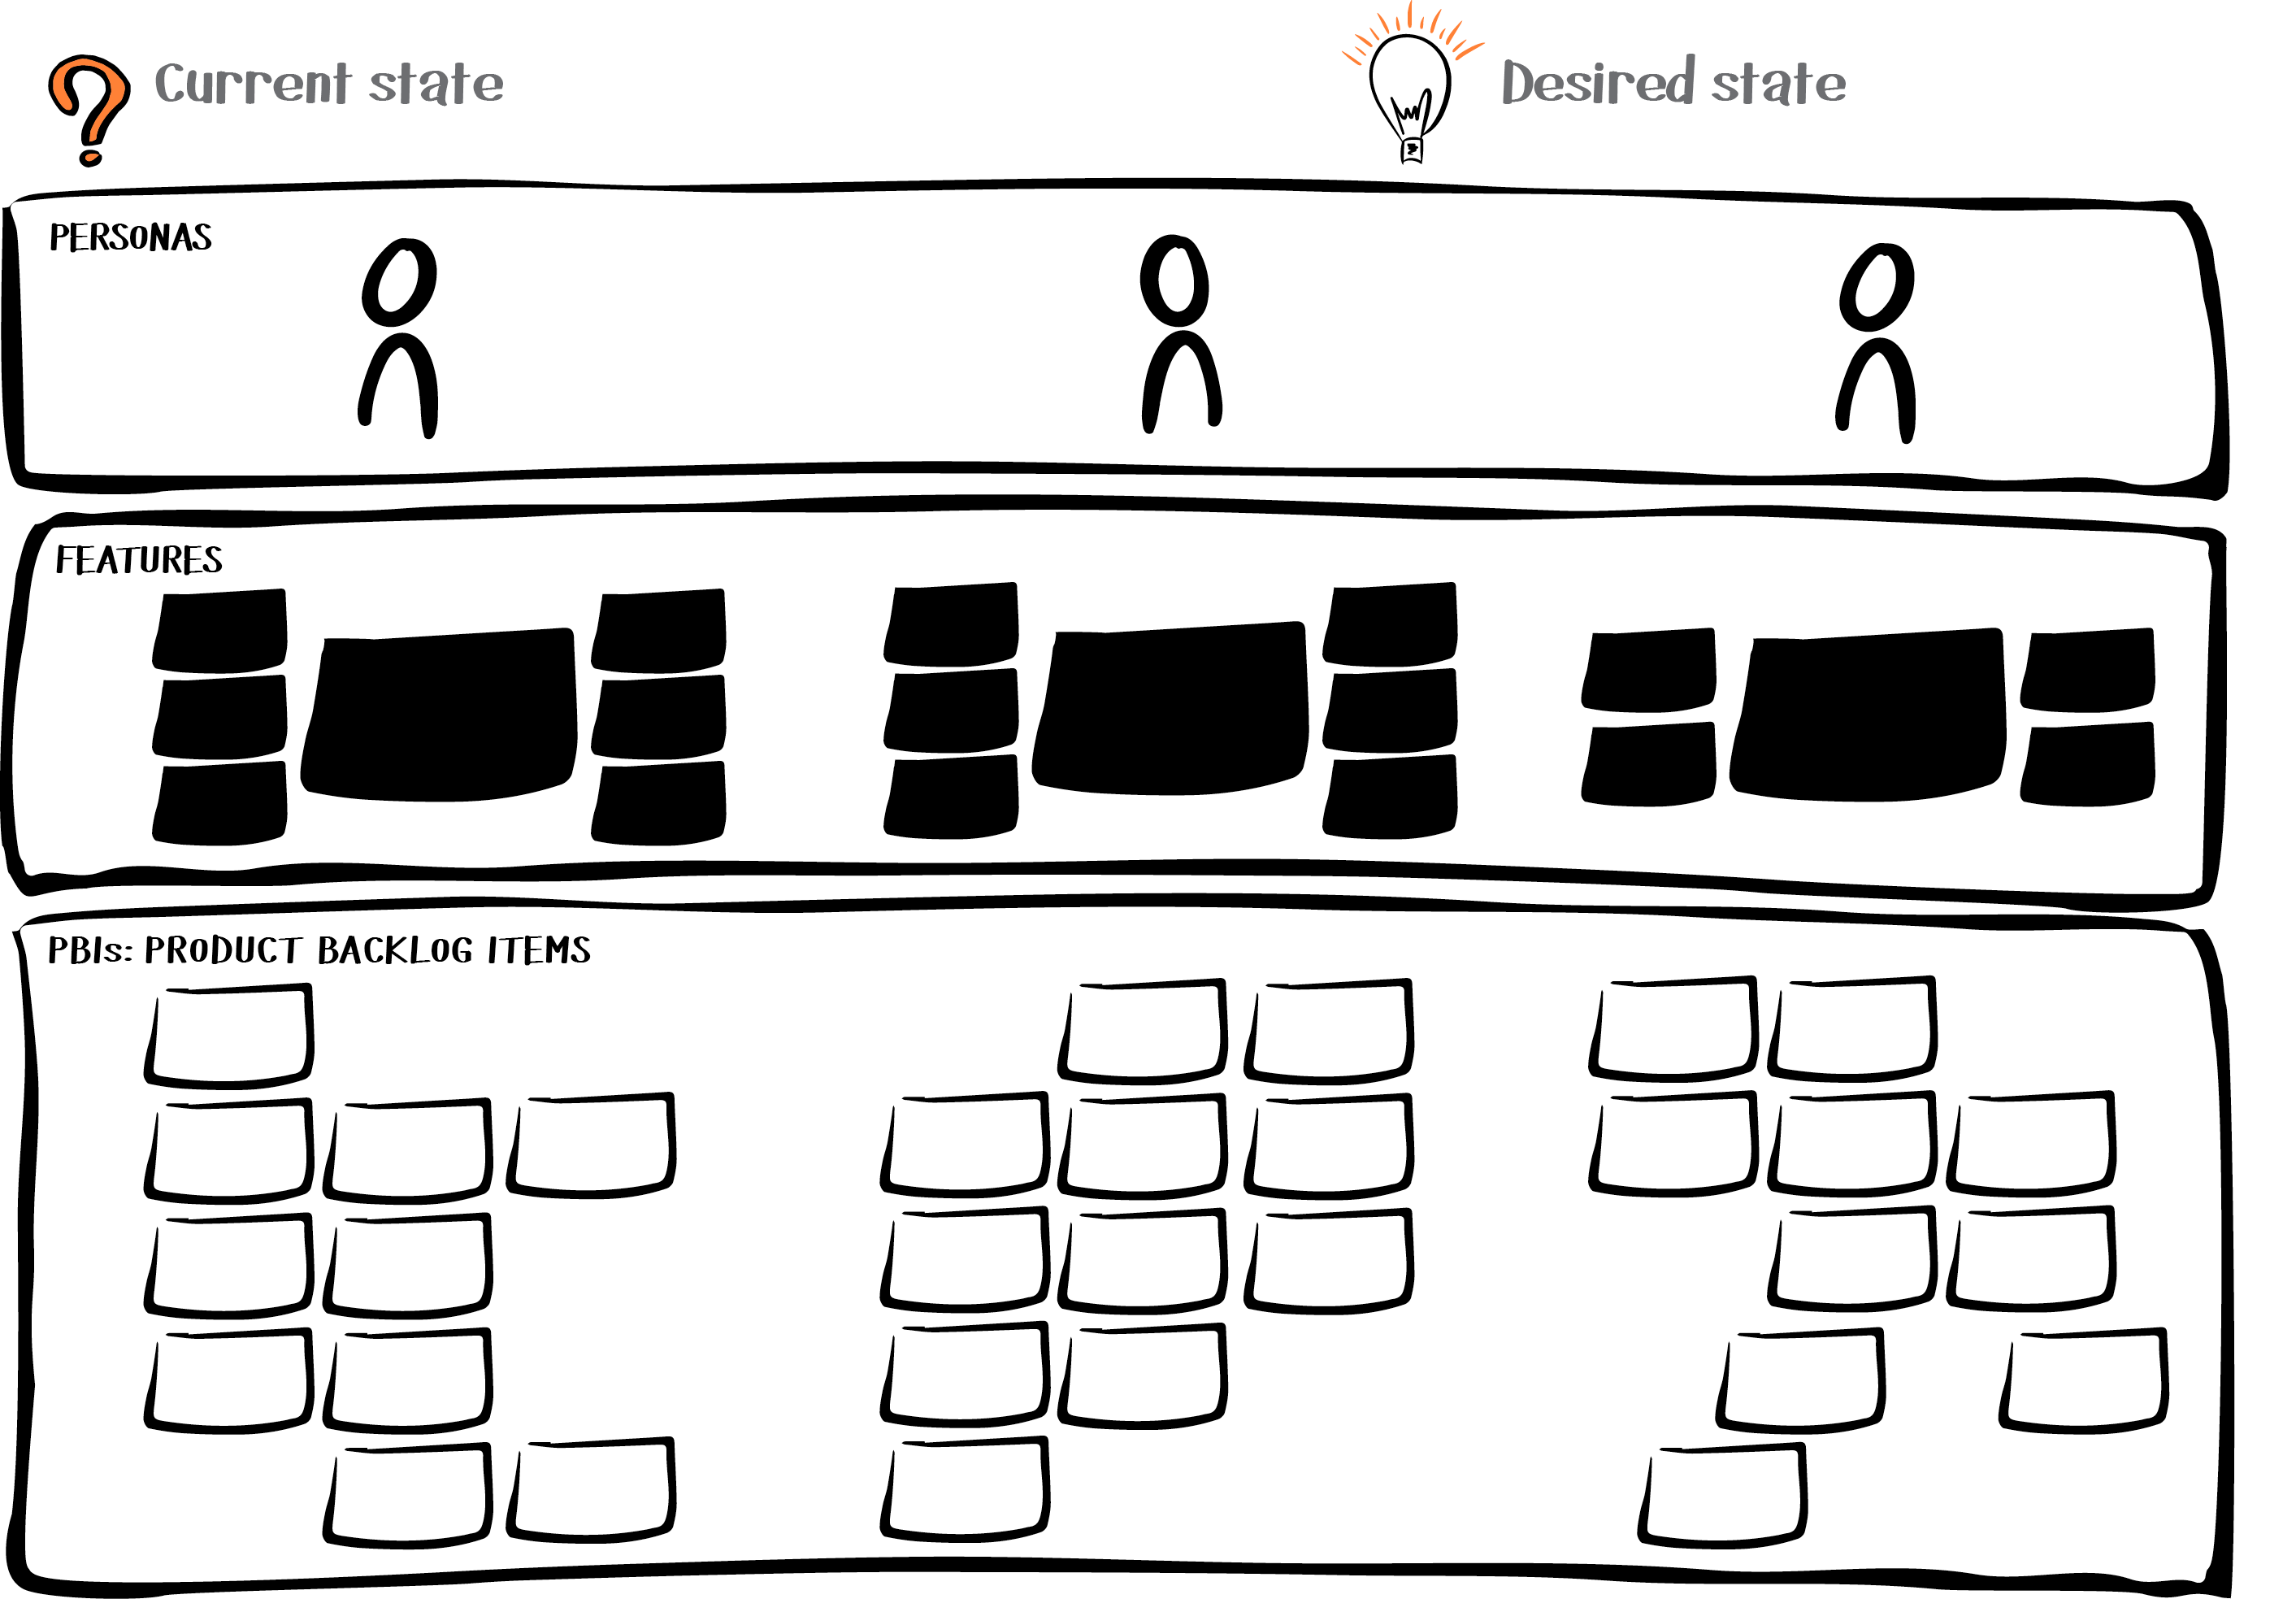
Connect the blocks as a User Story
The Product Backlog Items form the basis for the list of User
Stories. You take each PBI and use the persona and features to flesh
out the typical User Story template. The figure below shows an example
of this.
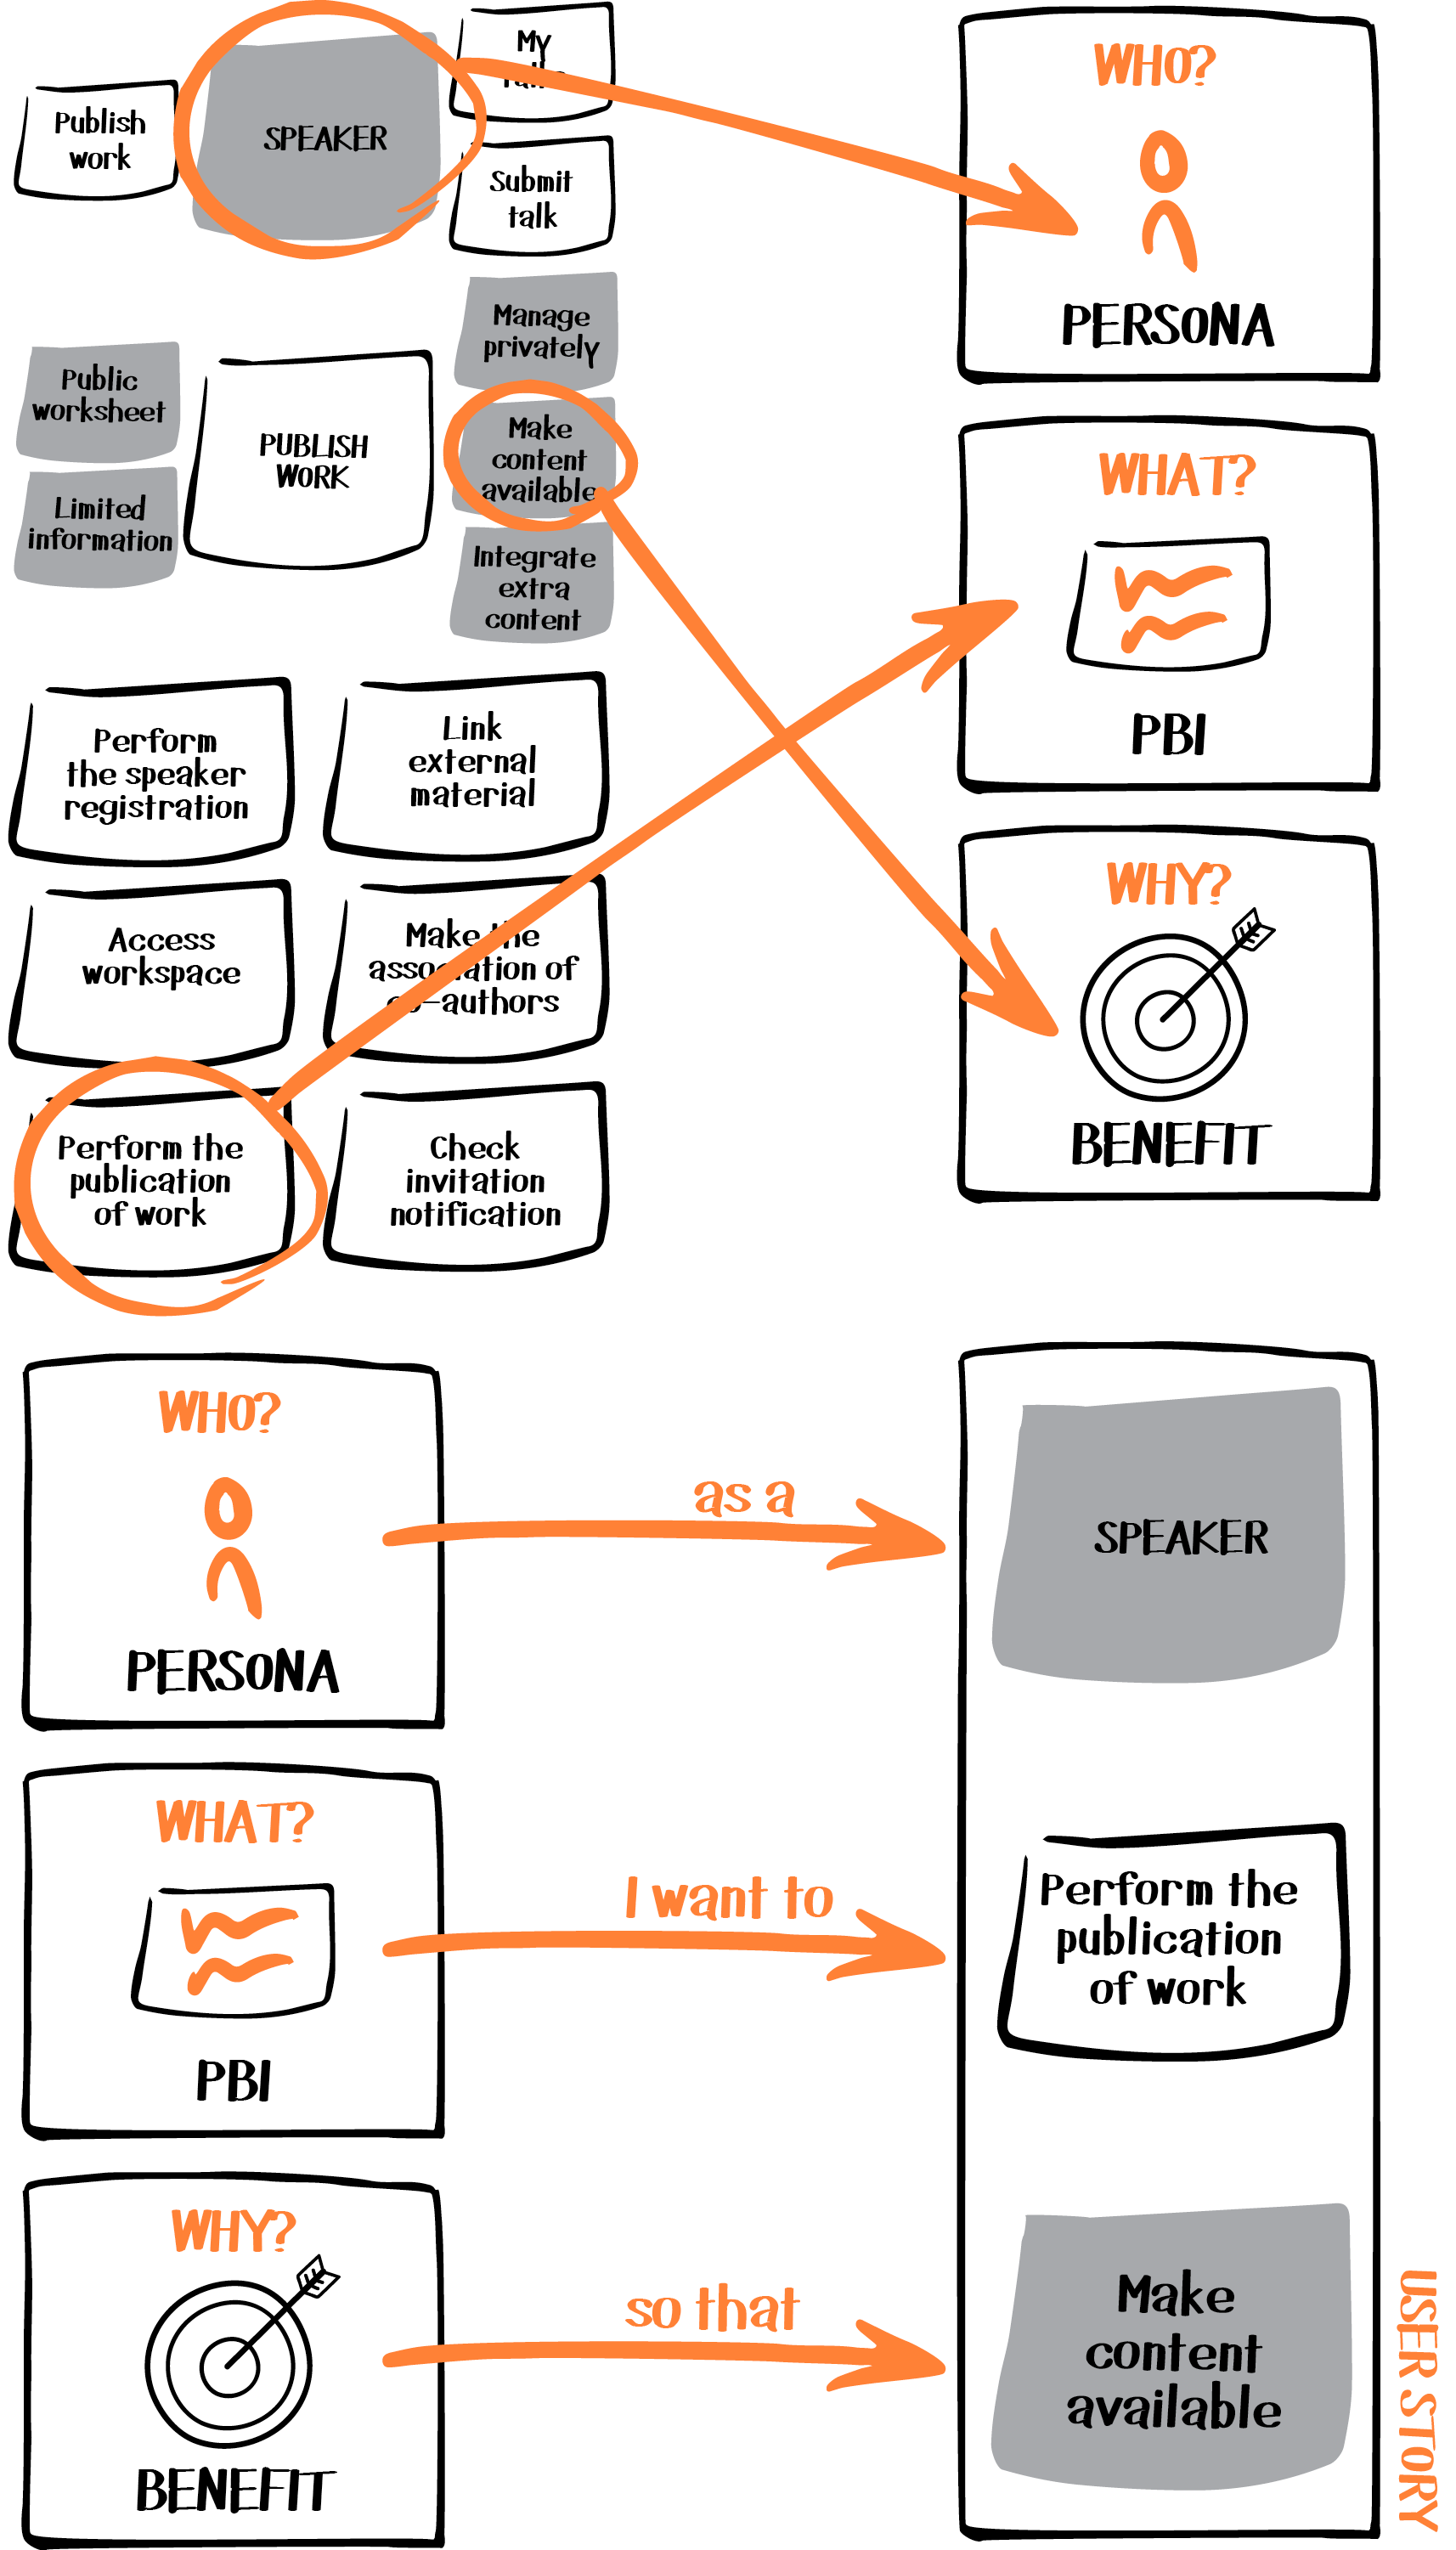
Figure 6: Writing User Story with PBB
- You fill the as a section, the who, of the story with the persona
profile, written on a post-it on the Persona block of the PBB canvas.
In the case it is ´speaker´.
- You fill the I want to section, the action, with the post-it on the Product Backlog Items block of the PBB canvas.
It represents one of the steps for building the Publish work feature.
For this story it's ´perform the publication of work´
- You fill the so that section, the benefit, with one of the post-its next to the Publish work feature. It represents one of the
benefits of the feature, here ´make content available´
So the final story reads:
As a speaker
I want to perform the publication of work
so that I can make content available
After writing the core elements of the User Story, it is time to fill it up with the extra information on Acceptance criteria,
tasks, User Interface, and enablers (if any). You can do it in the Product Backlog Items area of your PBB
canvas, or start documenting it on your tool of preference for recording User Stories.
User Story example
Below you find some details about the description of three
features for the Talks Collection digital product with some User Stories, acceptance criteria, tasks and
interface:
Following are the three sample features with their respective
personas and User Stories.
Persona: Speaker
Feature 1: Publish talk
- Story 1.1: As a speaker, I want to access a workspace in order to manage talks
privately
- Story 1.2: As a speaker, I want to publish talks in order to make content available.
- Story 1.3: As a speaker, I want to link the external presentation in order to
integrate talks
Persona: Participant
Feature 2: Participate in an event
- Story 2.1: As a participant, I want to find the available event in
order to view the schedule.
- Story 2.2: As a participant, I want to register for an event in order
to attend it.
- Story 2.3: As a participant, I want to check in at the event in order
to confirm attendance.
Persona: Organizer
Feature 3: Organize event
- Story 3.1: As an organizer, I want to define the event's schedule in
order to publicize the schedule.
- Story 3.2: As an organizer, I want to promote the event in the media in
order to attract an audience.
- Story 3.3: As an organizer, I want to invite co-organizers of the event
in order to facilitate organization.
Filling out the user story
This simple template is the core of a user story, but there a number
of additional elements that are worth writing down. While the PBB Canvas
doesn't aid in these further details, it's useful here to describe them.
You can add these to the PBIs in the canvas, or use other tools for story
tracking.
Acceptance Criteria
The acceptance criteria are intended to describe how to validate a User
Story. In doing so, acceptance criteria provide a checklist that determines when a User Story
is done, complete, and working. Below is a sample User Story from the
Product Backlog Building book:
“As an account holder, I want to withdraw money at the ATM to avoid
the bank line”.
Here is a possible acceptance criteria for this context:
- The account holder with sufficient balance is able to withdraw money
from her account.
- The account holder without sufficient balance is unable to withdraw
money from her account.
- The account holder with sufficient balance cannot withdraw money from
her account if the ATM does not have enough money to withdraw.
The format presented is compared to a checklist used to verify that
the story is complete and working, that is, if it passes through all the
acceptance criteria.
Breaking User Stories into tasks
It is very common to break a User Story into even smaller pieces about
the work that must be done, by stating, “these are the tasks.” By listing
the tasks needed to build a story, the development team goes into
technical details about how the smaller pieces will be implemented.
Unlike stories, tasks do not follow a defined textual format. They are
more direct, with a very technical language, from the development team to
the development team.
A task identifies something that needs to be done, something necessary
for a story. As such, the task will not necessarily be self-contained and
will not demonstrate business value. Most of them tend to be for
programmers, described in terms used by them. Some examples of tasks are,
change input table fields, create test accounts for users, and automate
data generation scripts.
User interface
Not every work item is associated with an interface. But for items
that will be associated with some user interface (or UI), you need to
clarify that association in the context of the User Story.
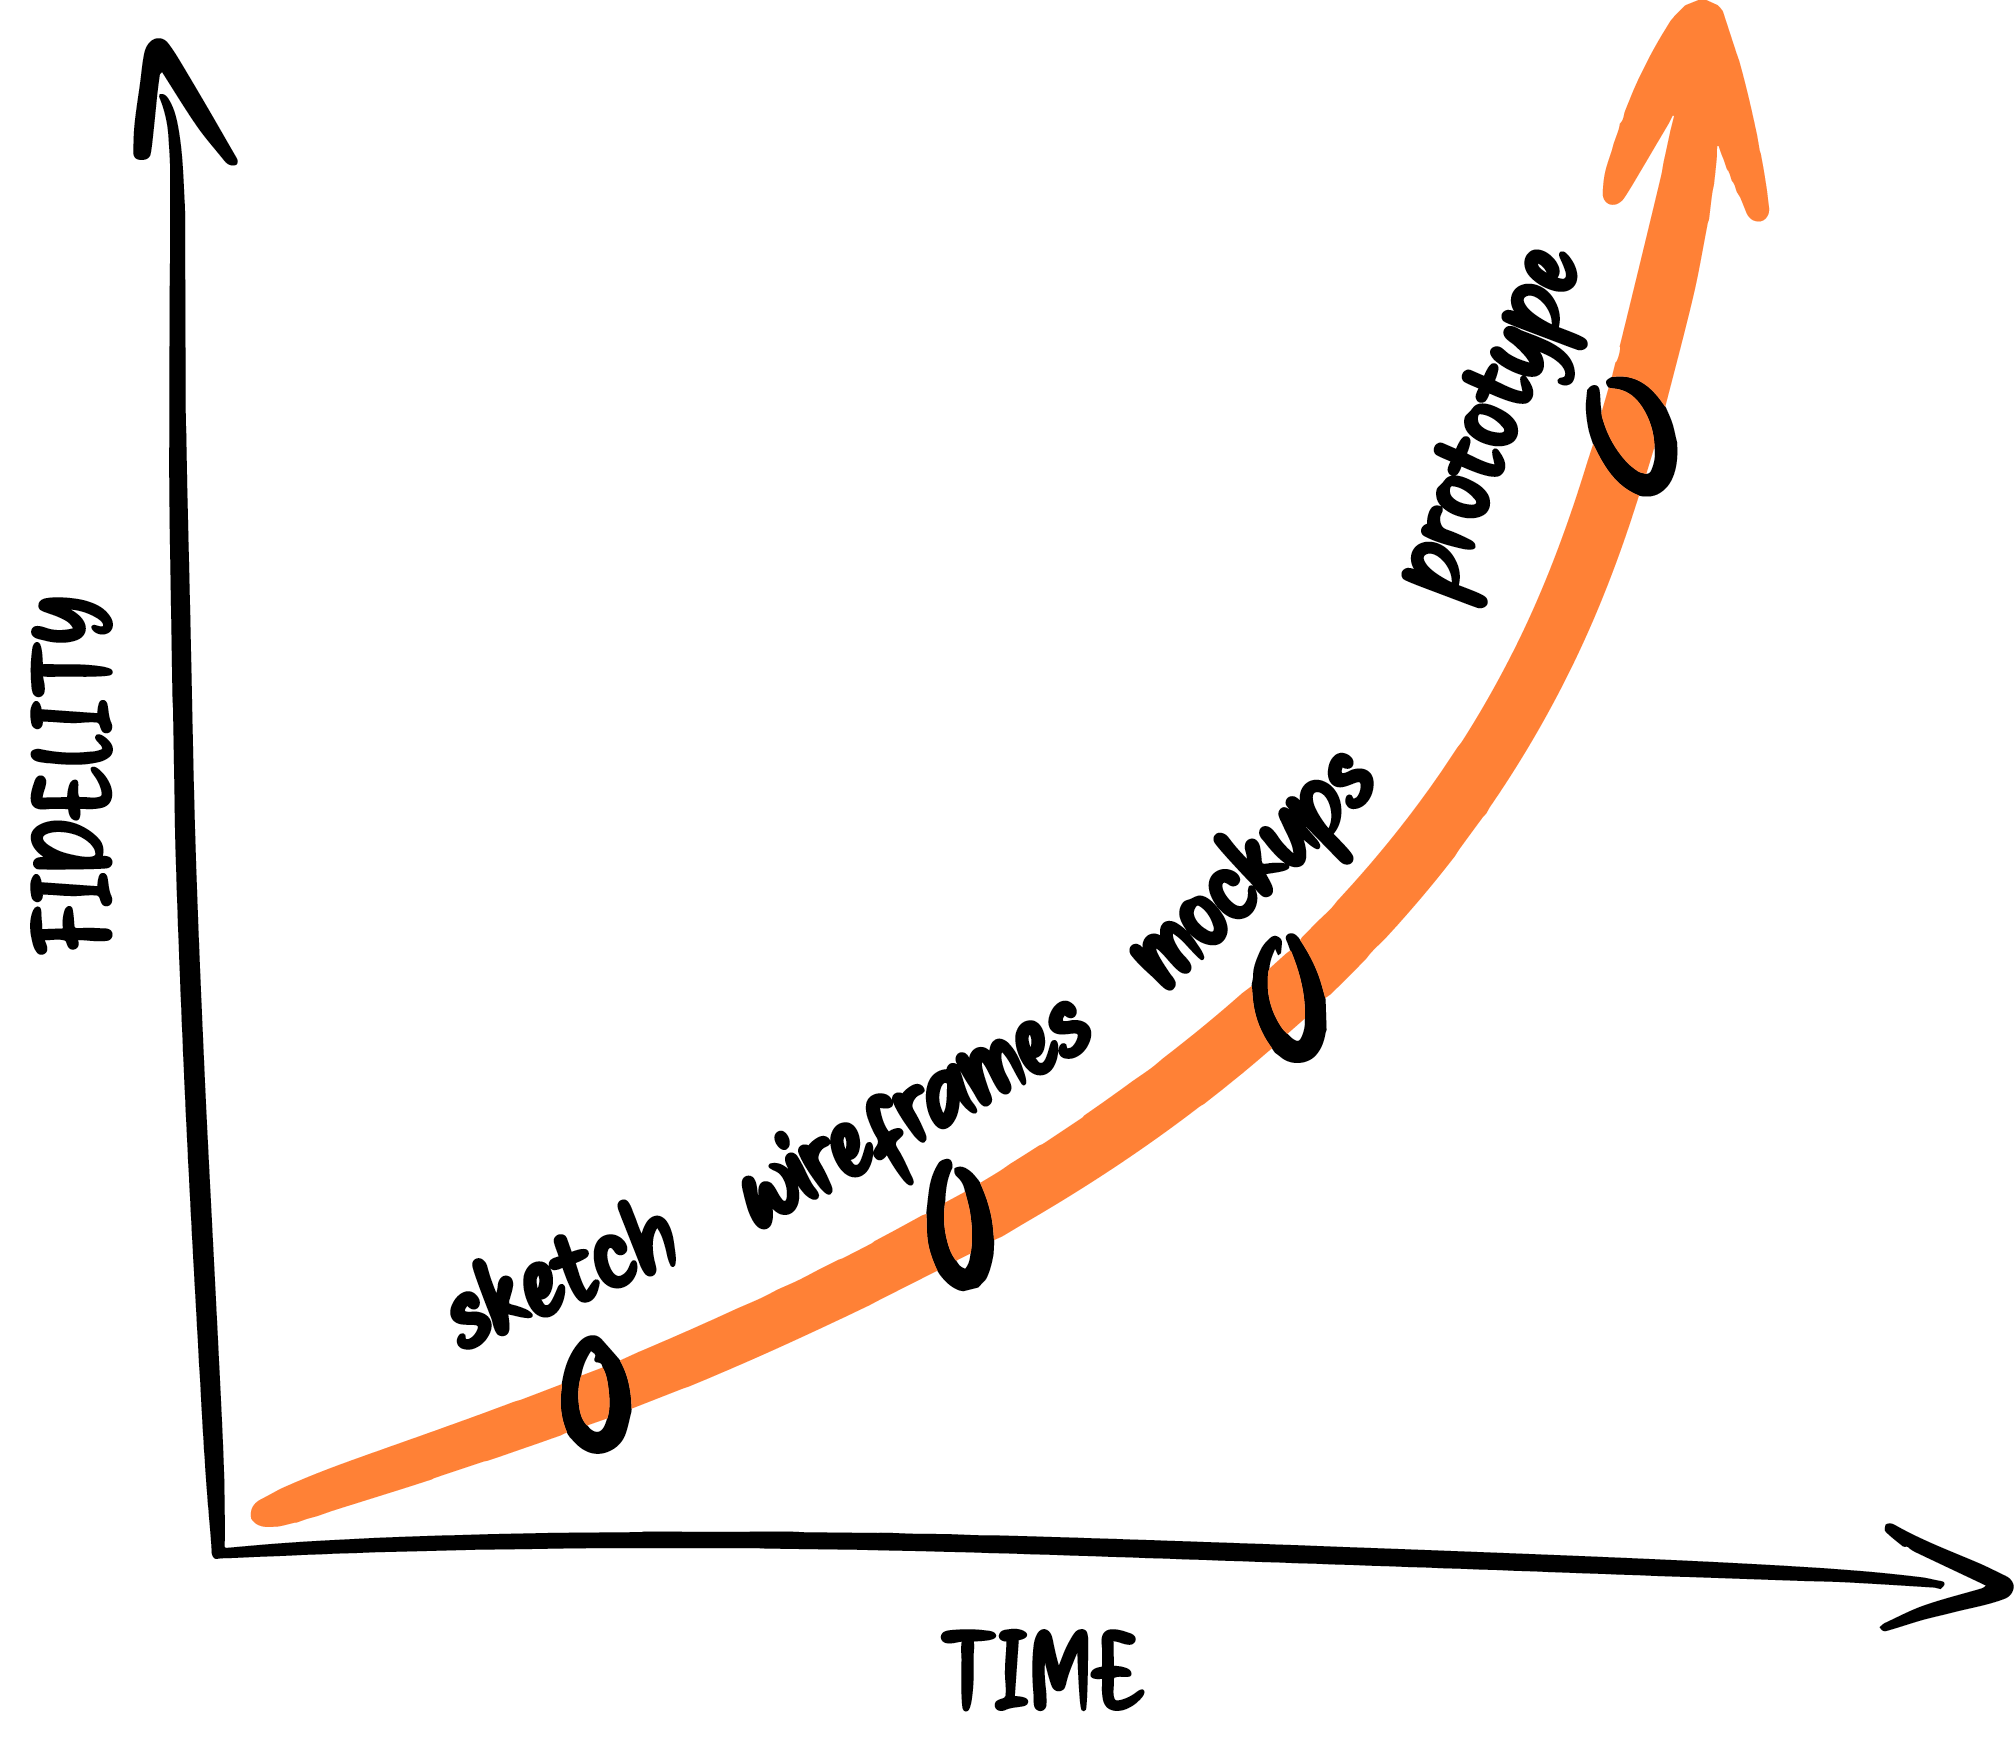
An interface can be described in a few ways: sketch (or simple
drawings on paper), wireframe, mockup, or prototype. The way to describe
it varies from team to team, depending on the team culture and the time
spent to detail it.
A question that arises is how much of the interface needs to be defined to
start working on the story? The answer is basically the team's agreement to
decide if the story is ready from a UI point of view. The most important thing
is that the group is aligned and comfortable with the work to be done.
Enabler
Sometimes writing a specific story can be difficult. As much as you try
to use the INVEST and 3Ws techniques as guides, for some cases, you still
can't write it satisfactorily. If this happens, try to see if you are
dealing with one of these two cases:
- The story relies on some previous study; or
- The story relies on something very technical that takes
considerable effort.
In both cases, you can either create a bigger story and consider this
a part of it, or you can break it down into something apart: an enabler.
This “something apart” is called the enabler because it is not adhered to
the story format. It is a work item needed to enable another story.
Exploratory Enabler
“As a developer, I want to research how asynchronous messaging works,
in order to decide how to implement chat.” This is not a story, and it
doesn't need to be described that way. This is an exploratory enabler,
needed before a User Story such as: “As an attendee, I want to send
messages in the event chat to interact with other attendees.”
This example demonstrates the need to work on an exploratory enabler –
“Research how asynchronous messaging works” – before working on the
story. An exploratory enabler performs research, background activities,
clarification, and/or choosing between options to enable effective work
on a story.
Spike is a common synonym for exploratory enabler.
Technical Enabler
Non-functional requirements, refactorings, pipeline or test
infrastructure improvements – these are some examples of activities that
sometimes take too much effort to be considered as part of a user story.
In these cases, you can describe them as technical enablers. You must
also indicate which stories depend on them. However, be very careful not
to overdo it and end up with an enabler-only backlog.
There is no need to write technical enablers in User Story format.
Instead of “As a developer, I want to migrate the automated test suite to
improve performance”, use a more direct textual format, such as: “Perform
the automated test migration.”
Example of a filled-out user story
Now, check out an example of a story the “publish talk” feature of
Talks Collection. It provides a full example of a User Story with acceptance criteria,
tasks, Ui and enablers.
User Story 1.1
As a speaker, I want to link the external presentation in
order to integrate talks.
Acceptance Criteria 1
Scenario 1: Link presentation across presentation sharing platform
Given that there is a valid link on the SlideShare platform
When I associate the external presentation link
Then It will show a preview of the presentation on the screen
Acceptance Criteria 2
Scenario 2: Associate presentation when publishing talks
Given that the presentation link is valid
When I publish the talk
Then it will show the associated presentation in the published talk details
Tasks:
- Consume the presentation endpoint.
- Create a UI to show a PDF file of the presentation.
- Create logic in the backend to link presentation with published talk.
- Change parameter to public or private link.
- Create test data to verify that the link is valid.
- Change DB to include the presentation link.
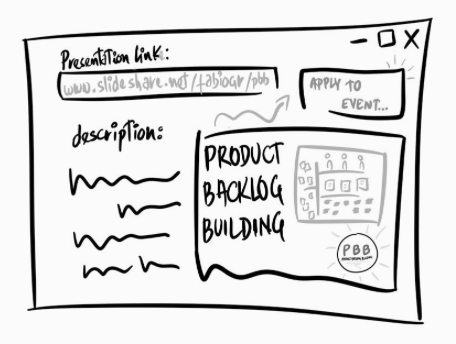
Interface Sketch
Exploratory Enabler:
Study endpoint API integration with online presentation
sharing platforms (SlideShare and Speaker Deck).
Technical Enabler:
Consume the oEmbed endpoint as a link tag in the header
so it can be automatically detected when embedding the
presentation.
Defining Ready and Done
Definition of Ready
The Definition of Ready (DoR) is the agreement between the team that
indicates when a PBI is ready to be pulled into a Sprint, that is, when
it has enough information to go into planning, execution, and delivery.
People often say, “This item is ready to start work”, and generally this
indicates that the team:
- Has the necessary information to work on the item.
- Understands the reason for the item.
- Can demonstrate the completion of the item.
- Identifies how the item composes/relates to a feature.
- Agrees that the item fits in a Sprint, or the designated time frame.
In relation to each PBI candidate for the next Sprint (or iteration of
work), the team checks the PBI Ready Checklist:
PBI ready checklist
- PBI is represented by a User Story.
- PBI is covered by acceptance criteria.
- PBI acceptance tests are identified (to be
enhanced or created)
- PBI has the necessary User Experience artifacts.
- PBI dependencies are identified (if any).
This list is an example of a checklist for DoR. Generally, teams define
and maintain their checklists, which demonstrate their preferences in
preparing the work.
Refinement of the product backlog must be continuous. The team will be
continuously working on the next candidate items, preparing them for the
next Sprint or work interaction. The use of the ready definition and the
done definition is not limited to Scrum alone; it is also a very useful
practice when working with Kanban and other agile methods.
Definition of Done
Definition of Done (DoD) is the agreement that demonstrates the
quality of the PBI produced, in which “done” confirms everyone's
satisfaction with the work performed.
DoD clarifies the understanding of the work completed as part of the
product increment. The moment a PBI meets the definition of done, it
means that the increment is ready to be released into the product.
If a PBI does not meet the DoD, it should not be released or even
featured in the Sprint Review. It must remain a work in progress (WIP)
for the team.
For each PBI considered done, the team demonstrates that the item:
PBI done checklist
- Delivers an increment of the product.
- Complies with the established acceptance criteria.
- Is documented for use.
- Adheres to coding standards.
- Maintains product performance indices.
This list is an example checklist for the DoD. Teams define and
maintain checklists, which demonstrate their preferences in job
verification.
You can download these sample DoR and DoD checklists as extra
resources from the Product Backlog Building here.